| 일 | 월 | 화 | 수 | 목 | 금 | 토 |
|---|---|---|---|---|---|---|
| 1 | 2 | 3 | ||||
| 4 | 5 | 6 | 7 | 8 | 9 | 10 |
| 11 | 12 | 13 | 14 | 15 | 16 | 17 |
| 18 | 19 | 20 | 21 | 22 | 23 | 24 |
| 25 | 26 | 27 | 28 | 29 | 30 | 31 |
Tags
- 백준
- design pattern
- MySQL
- Heap
- JavaScript
- 자료구조
- 알고리즘
- 네트워크
- redis
- react
- JPA
- IT
- OS
- Spring
- 자바
- Ethereum
- C
- Data Structure
- 파이썬
- spring webflux
- 운영체제
- Road to Web3
- Galera Cluster
- mongoDB
- Java
- Algorithm
- Blockchain
- 디자인 패턴
- MSA
- 컴퓨터구조
Archives
- Today
- Total
시냅스
nGrinder 설명과 사용법 정리 본문

nGrinder
- JMeter 와 같은 부하 및 성능 테스트 도구
- JMeter 와 차이점은
- JMeter 는 단일 데스크톱 컴퓨터에서 수행되는 반면에 nGrinder 는 컨트롤러 및 에이전트로 구성된 분산 아키텍처로 수행된다.
- nGrinder는 jython 또는 Groovy 같은 스크립트 언어를 사용하여 스크립트를 작성한다.
- 클라우드 환경에서도 실행 가능하다.
- Controller
- 테스트를 생성하고, 실행하고, 테스트 결과를 수집하고 분석한다.
- 단일 머신에 설치된다.
- Agent
- 컨트롤러가 생성한 테스트를 수행하는 실행 환경.
- 각 에이전트는 분산된 머신 또는 가상 머신에 설치된다.
- 에이전트가 테스트에 필요한 부하를 생성하고, 데이터를 수집하여 컨트롤러에 전송한다.
설치
https://github.com/naver/ngrinder/releases
Releases · naver/ngrinder
enterprise level performance testing solution. Contribute to naver/ngrinder development by creating an account on GitHub.
github.com
에서 war 파일을 받은 후
java -jar ngrinder-controller-{version}.war --port=7070
로 war 파일을 실행한다.
설정한 포트번호를 기억하여 localhost:7070 으로 접속한다.
단 이때 tmpdir 을 셋팅하라는 에러메세지가 출력 될 수도 있는데,
java -Djava.io.tmpdir=${NGRINDER_HOME}/lib -jar ngrinder-controller.war
와 같은 모습으로 실행할 수 있다.

초기 계정
ID : admin
PW : admin
으로 접속한다.

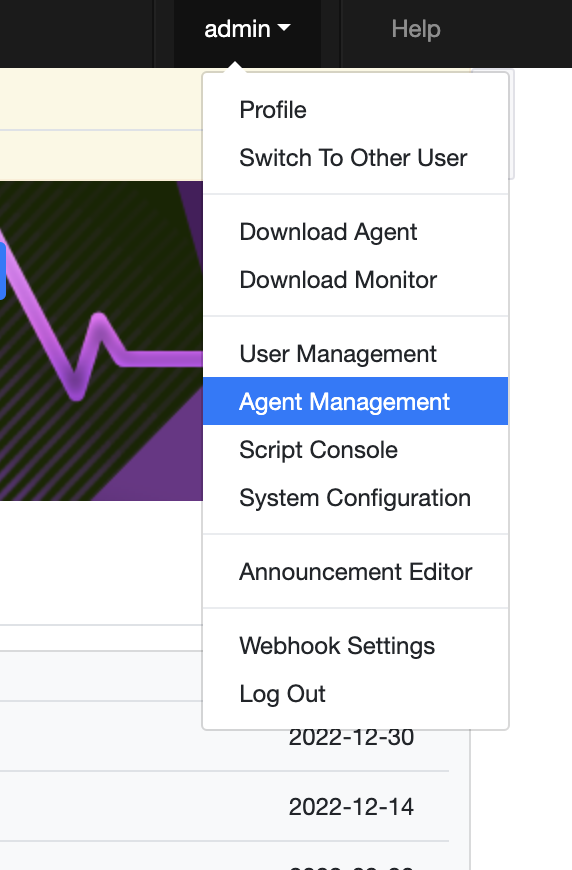
Agent 를 다운로드 해 주고,
// 압축 해제
tar -xvf ngrinder-agent-{version}-localhost.tar
// 폴더로 이동
cd ngrinder-agent
// 쉘파일 실행
./run_agent.sh
실행이 완료되면


위와 같이 Agent 를 확인할 수 있다.

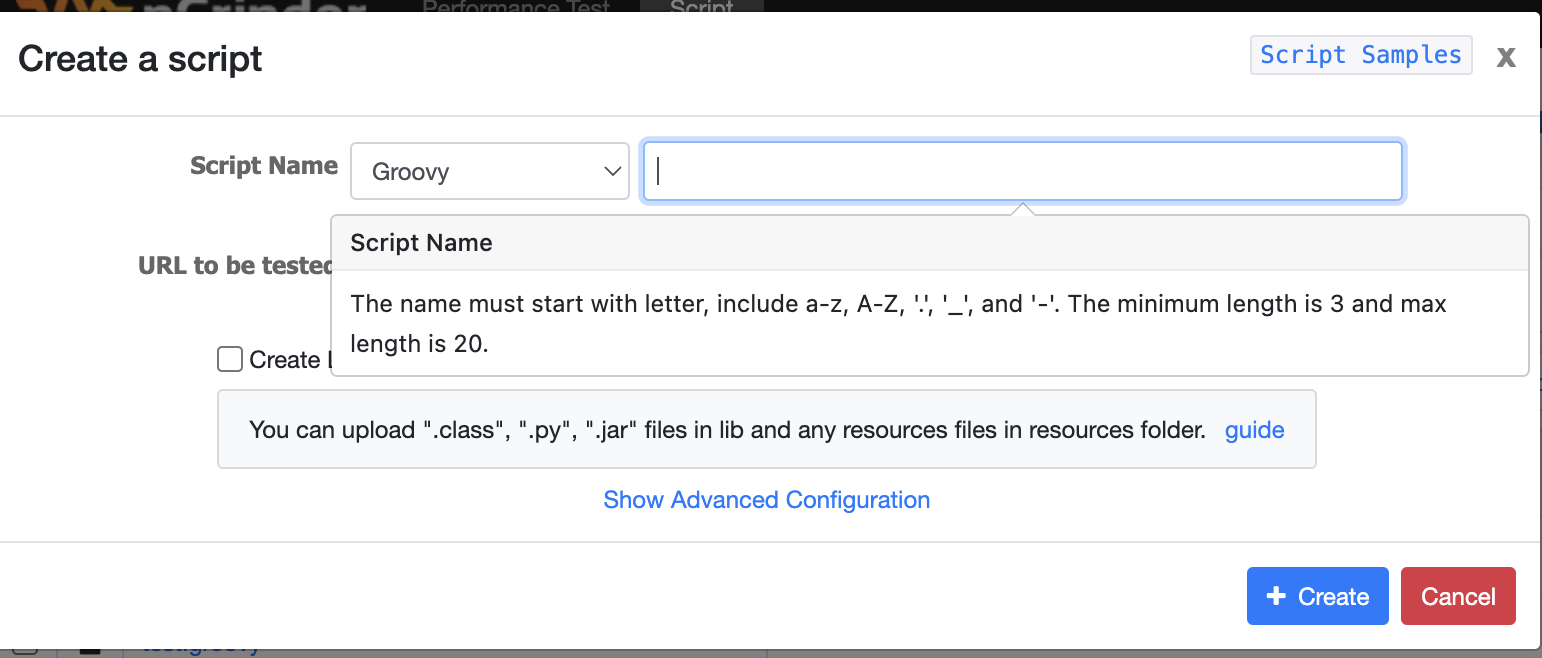
상단에 있는 Script 에 들어가서 create Script를 누르면 위와 같은 화면을 확인할 수 있다.
사용할 이름과, URL을 설정하면 기본 스크립트를 보여준다.
import static net.grinder.script.Grinder.grinder
import static org.junit.Assert.*
import static org.hamcrest.Matchers.*
import net.grinder.script.GTest
import net.grinder.script.Grinder
import net.grinder.scriptengine.groovy.junit.GrinderRunner
import net.grinder.scriptengine.groovy.junit.annotation.BeforeProcess
import net.grinder.scriptengine.groovy.junit.annotation.BeforeThread
// import static net.grinder.util.GrinderUtils.* // You can use this if you're using nGrinder after 3.2.3
import org.junit.Before
import org.junit.BeforeClass
import org.junit.Test
import org.junit.runner.RunWith

import org.ngrinder.http.HTTPRequest
import org.ngrinder.http.HTTPRequestControl
import org.ngrinder.http.HTTPResponse
import org.ngrinder.http.cookie.Cookie
import org.ngrinder.http.cookie.CookieManager

/**
* A simple example using the HTTP plugin that shows the retrieval of a single page via HTTP.
*
* This script is automatically generated by ngrinder.
*
* @author admin
*/
@RunWith(GrinderRunner)
class TestRunner {

	public static GTest test
	public static HTTPRequest request
	public static Map<String, String> headers = [:]
	public static Map<String, Object> params = [:]
	public static List<Cookie> cookies = []

	@BeforeProcess
	public static void beforeProcess() {
		HTTPRequestControl.setConnectionTimeout(300000)
		test = new GTest(1, "127.0.0.1")
		request = new HTTPRequest()
		grinder.logger.info("before process.")
	}

	@BeforeThread
	public void beforeThread() {
		test.record(this, "test")
		grinder.statistics.delayReports = true
		grinder.logger.info("before thread.")
	}

	@Before
	public void before() {
		request.setHeaders(headers)
		CookieManager.addCookies(cookies)
		grinder.logger.info("before. init headers and cookies")
	}

	@Test
	public void test() {
		HTTPResponse response = request.GET("<http://127.0.0.1:8080>", params)

		if (response.statusCode == 301 || response.statusCode == 302) {
			grinder.logger.warn("Warning. The response may not be correct. The response code was {}.", response.statusCode)
		} else {
			assertThat(response.statusCode, is(200))
		}
	}
}
여기에서는 작동방법만 확인할 예정으로 다른 테스트는 구현하지 않는다.

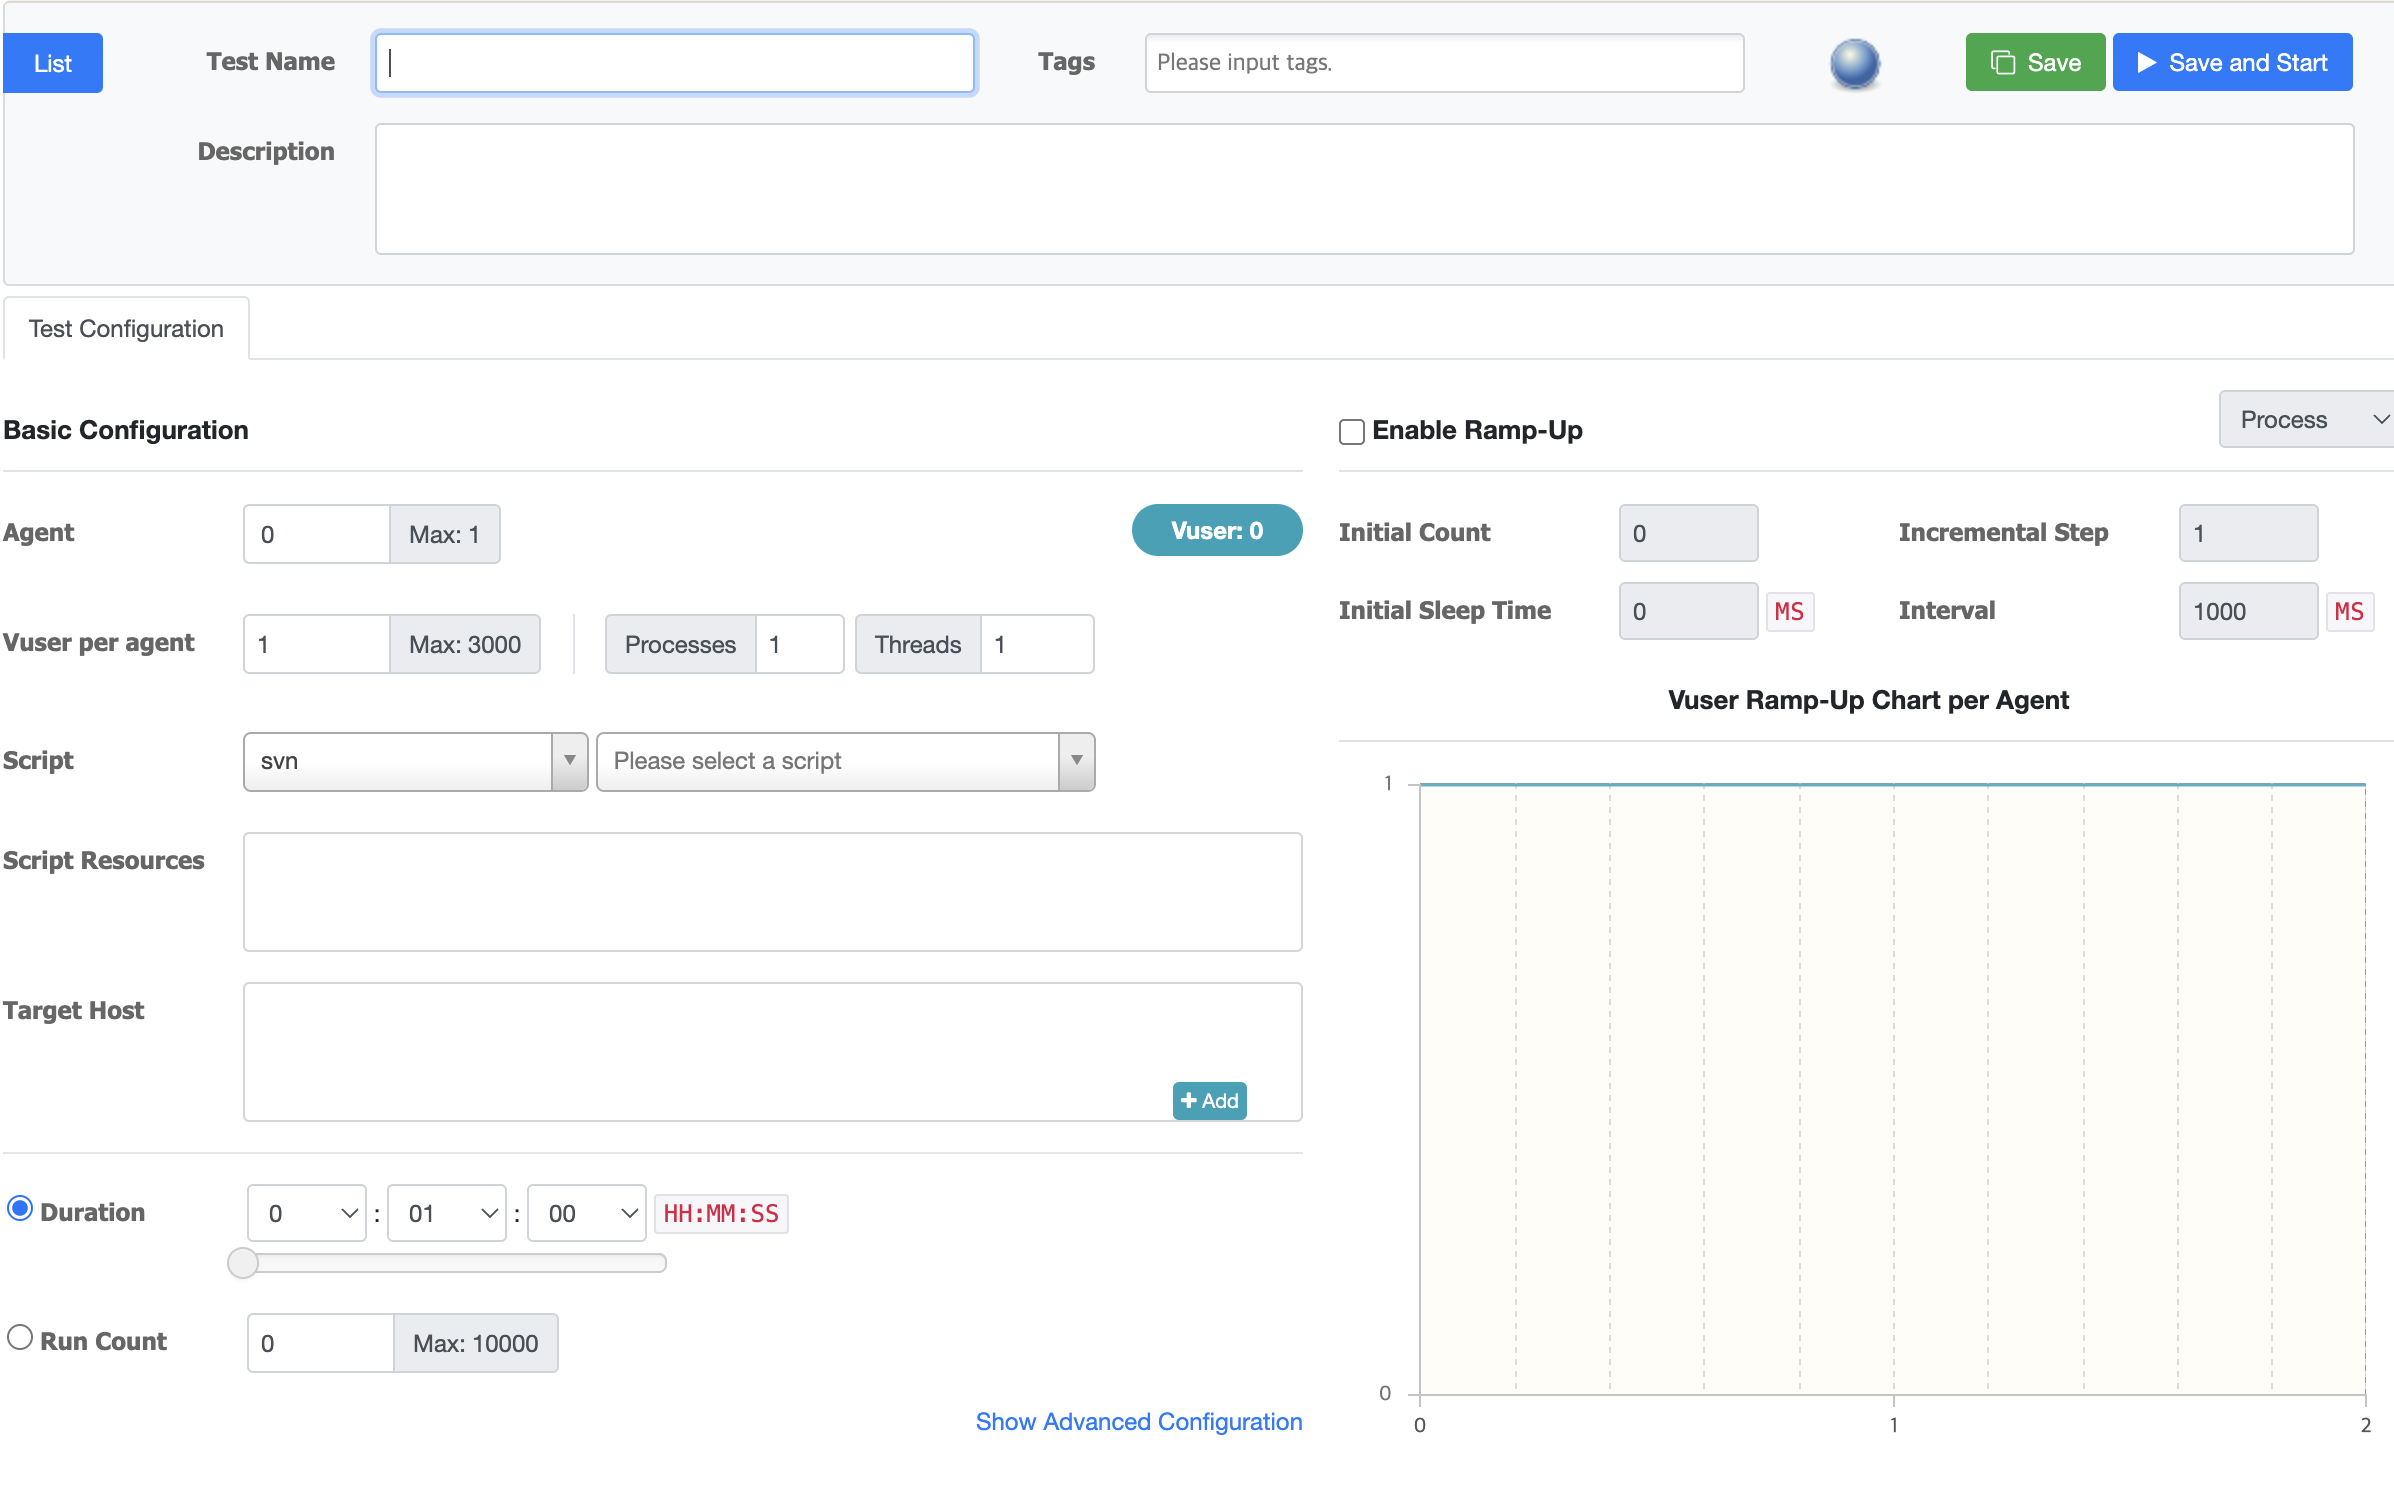
이후 Performance Test에서 Create Test 를 누르면 셋팅할 수 있는 화면을 보여준다.
각각은 다음과 같다
- Agent
- 성능 측정에 사용할 Agent
- Agent를 여러개로 구성하고 싶은 경우 Docker 나 cloud service 를 고려해 볼 수 있다.
- Vuser per agent
- Agent 당 설정할 가상 사용자 수
- 동시에 요청을 날리는 사용자
- Process / Thread
- 하나의 Agent에서 생성할 프로세스와 스레드 개수
- Script
- 성능 측정 시 각 Agent 에서 실행할 스크립트
- 방금 우리가 생성한 Script를 추가한다.
- Duration
- 성능 측정 수행 시간
- Run Count
- 스레드 당 테스트 코드를 수행하는 횟수
- Run Count와 Duration의 경우 둘 중 하나만 선택해서 기간 동안 실행하거나, Run Count 만큼 실행하게 한다.
- Enable Ramp-up
- 성능 측정 과정에서 가상 사용자를 점진적으로 늘리도록 활성화
- Initial Count
- 처음 시작 시 가상 사용자 수
- Initial Sleep Time
- 테스트 시작 시간
- Incremental Step
- Process 또는 thread 를 증가시키는 개수
- Interval
- Process 또는 Thread를 증가시키는 시간 간격

테스트를 완료하면 위와 같은 수행 결과서를 받는다.
- MTT 는 평균적인 1회 수행 시간으로 중요한 지표이다.
- TPS 는 초당 트랜잭션 개수를 말한다.
'Java, Spring' 카테고리의 다른 글
| Java 코드로 알아보는 직렬화와 역직렬화 (0) | 2023.02.28 |
|---|---|
| Visual VM과 nGrinder를 사용한 모니터링과 부하 테스트 (0) | 2023.02.19 |
| JMeter 설명과 사용법 정리 (0) | 2023.02.19 |
| JMX 와 VisualVM 그리고 Heap dump 분석하기 (0) | 2023.02.19 |
| Java 코드로 보는 Lock Striping 과 ConcurrentHashMap, CAS (Compare-And-Swap) (2) | 2023.02.17 |
Comments


